Sunday, December 20, 2015
Default User Name and Passwords
I have to add this web site to my blog because sometimes when I'm in a hurry I cannot find this web site.
This is the web site that will tell you the default user name and passwords for a large number of makes and models of switches, routers and modems.
http://www.phenoelit-us.org/dpl/dpl.html
This web site's information has saved me a ton of hair loss and it had to be added to my blog.
To the creator/creators of this wonderment....
THANK YOU SO VERY MUCH.
I hope this never disappears from the World Wide Web.
Read more »
This is the web site that will tell you the default user name and passwords for a large number of makes and models of switches, routers and modems.
http://www.phenoelit-us.org/dpl/dpl.html
This web site's information has saved me a ton of hair loss and it had to be added to my blog.
To the creator/creators of this wonderment....
THANK YOU SO VERY MUCH.
I hope this never disappears from the World Wide Web.
Loopback Plug's (T1 and Ethernet)
The other day I was installing a router and switch that needed to be trunked to a preexisting switch and a new firewall.
There were two T1 lines that needed to be routed before the VLAN's could be configured. Well the one T1 was not working and I had to trouble shoot what was going on. In doing so I created loopback plugs on the fly to test the ports for connectivity.
Loopback plugs are not only great for loopback tests, but they can save a little bit of time to see if a port is working without consoling in. That was one part of the trouble shooting was to see if the T1 module on the router was operational. I plugged in the loopback plug and the status was green. With the cable coming from the jack to the router it was red.
In the end it was an ISP issue. They inadvertently crossed the tip and ring set and it was an easy fix.
To make a T1 loopback plug do this:
Cut about 1 foot cord of twisted pair and strip off the casing that holds all the pairs together. Usually it's blue, grey, yellow or green. Untwist on paired color. I like to use the dark colors just so I can see where they are going in the RJ45 end.
Get a RJ45 end. The slots are numbered with the clip facing down towards your feet 1 - 8.
Insert one wire into slot 1 and the other wire into slot 2.
Insert slot 1's other end into slot 4 and slot 2's into slot 5 and terminate or crimp the end.
So the short description is 1 to 4 and 2 to 5 and you will have about 6 inches of wire hanging out. I put masking tape on these wires just for easy handling when removing it from the port. I would label it also for future use.
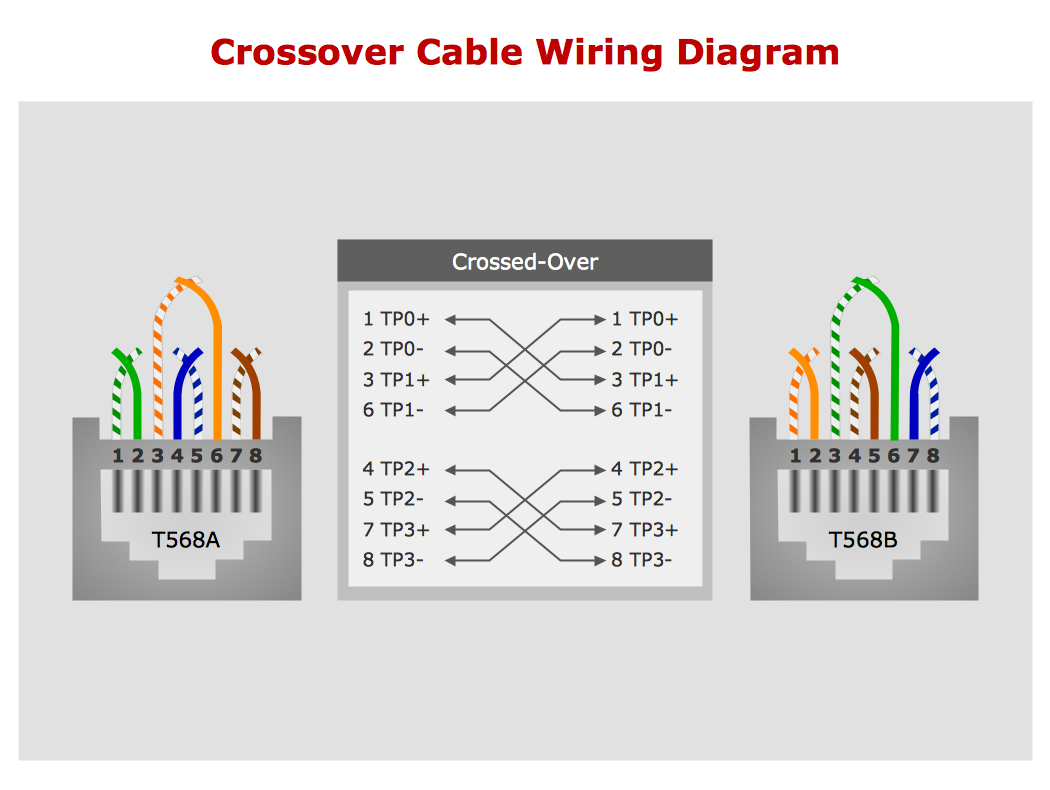
To make an Ethernet Loopback Plug do this:
Follow the exact same steps above. The only thing that changes is the pin count.
Place a wire end into slot 1 and another into slot 2.
Take slot 1's end and place it into slot 3 and take slot 2's and place it into slot 6.
So the pin count is 1 to 3 and 2 to 6. Crimp, tape and label.
Remember: A T1 loopback plug is for T1 ports it will not work with Ethernet ports and vice versa.
These are very easy to make and will save you a little bit of time and money in the long run.
J
Read more »
There were two T1 lines that needed to be routed before the VLAN's could be configured. Well the one T1 was not working and I had to trouble shoot what was going on. In doing so I created loopback plugs on the fly to test the ports for connectivity.
Loopback plugs are not only great for loopback tests, but they can save a little bit of time to see if a port is working without consoling in. That was one part of the trouble shooting was to see if the T1 module on the router was operational. I plugged in the loopback plug and the status was green. With the cable coming from the jack to the router it was red.
In the end it was an ISP issue. They inadvertently crossed the tip and ring set and it was an easy fix.
To make a T1 loopback plug do this:
Cut about 1 foot cord of twisted pair and strip off the casing that holds all the pairs together. Usually it's blue, grey, yellow or green. Untwist on paired color. I like to use the dark colors just so I can see where they are going in the RJ45 end.
Get a RJ45 end. The slots are numbered with the clip facing down towards your feet 1 - 8.
Insert one wire into slot 1 and the other wire into slot 2.
Insert slot 1's other end into slot 4 and slot 2's into slot 5 and terminate or crimp the end.
So the short description is 1 to 4 and 2 to 5 and you will have about 6 inches of wire hanging out. I put masking tape on these wires just for easy handling when removing it from the port. I would label it also for future use.
To make an Ethernet Loopback Plug do this:
Follow the exact same steps above. The only thing that changes is the pin count.
Place a wire end into slot 1 and another into slot 2.
Take slot 1's end and place it into slot 3 and take slot 2's and place it into slot 6.
So the pin count is 1 to 3 and 2 to 6. Crimp, tape and label.
Remember: A T1 loopback plug is for T1 ports it will not work with Ethernet ports and vice versa.
These are very easy to make and will save you a little bit of time and money in the long run.
J
Friday, December 18, 2015
Gmail SSL, bad start, and stress induced coma's
Wow..... What a day.
Started off late and it set the tone for the day. Cell phone died right in the middle of a tech support call with a spectacular customer of mine. I was on the road and didn't have my charger with me.
Got on site to another spot and was 5 minutes late. I thank the Lord for understanding people.
While on site I remoted into my other customers server only to find that Active Directory was destroyed due to a power surge and a dirty shutdown. They were dead in the water and I was 100 miles away. In the end I got them up to a working state, but not how I would like to have left it by any means.
It just got better from there.... At one point I swear my brain shut down and I went into a coma or was that auto pilot?
Anyways on to the good stuff:
If you own a Gmail account I highly recommend you turn on the SSL in the settings. Back in August of 2008 Some ingenious technological aficionados showed the world that it was very easy to hack Gmail accounts. Especially if you surf on an unencrypted network like the one at your coffee shop or the airport.
I won't go into great detail about it, but if you are interested here is a link:
http://www.hungry-hackers.com/2008/08/gmail-account-hacking-tool.html
To turn on SSL for your Gmail account do this...
Log into your Gmail account and go to settings (upper right hand corner)
Scroll down until you see Browser Connection
Choose Always Use HTTPS
Click on save button and log back in
I'm bringing this up because I was on an unencrypted network today and was thinking "What if the computer I was using had a key logger? What if my Gmail got cracked.. Well at least I got half of it covered with SSL"
This brief thought came between my stress induced coma and my coffee fueled awakening.
J
Read more »
Started off late and it set the tone for the day. Cell phone died right in the middle of a tech support call with a spectacular customer of mine. I was on the road and didn't have my charger with me.
Got on site to another spot and was 5 minutes late. I thank the Lord for understanding people.
While on site I remoted into my other customers server only to find that Active Directory was destroyed due to a power surge and a dirty shutdown. They were dead in the water and I was 100 miles away. In the end I got them up to a working state, but not how I would like to have left it by any means.
It just got better from there.... At one point I swear my brain shut down and I went into a coma or was that auto pilot?
Anyways on to the good stuff:
If you own a Gmail account I highly recommend you turn on the SSL in the settings. Back in August of 2008 Some ingenious technological aficionados showed the world that it was very easy to hack Gmail accounts. Especially if you surf on an unencrypted network like the one at your coffee shop or the airport.
I won't go into great detail about it, but if you are interested here is a link:
http://www.hungry-hackers.com/2008/08/gmail-account-hacking-tool.html
To turn on SSL for your Gmail account do this...
Log into your Gmail account and go to settings (upper right hand corner)
Scroll down until you see Browser Connection
Choose Always Use HTTPS
Click on save button and log back in
I'm bringing this up because I was on an unencrypted network today and was thinking "What if the computer I was using had a key logger? What if my Gmail got cracked.. Well at least I got half of it covered with SSL"
This brief thought came between my stress induced coma and my coffee fueled awakening.
J
Friday, December 4, 2015


![FX GEN1] Audio/Video iPod/iPhone Integration into your FX](http://i1211.photobucket.com/albums/cc438/aeboarder3000/ConnectivityDiagram.jpg)

Subscribe to:
Posts (Atom)