Showing posts with label Interior. Show all posts
Showing posts with label Interior. Show all posts
Friday, December 4, 2015
Plywood Open Nightstand


Free woodworking plans to build simple nightstands out of plywood. Features a drawer and open shelving. You can build 2 nightstands out of 1 sheet of 4' x 8' plywood plus 3 quarter sheets for the drawer and back.
This is a relatively easy piece of bedroom furniture you can build with tools most DIY'ers have. Made from real plywood (since you choose your own wood) and not particle board like most furniture seems to be these days.
Dimensions
Dimensions: 22-1/2"W x 26"H x 19"


What You'll Need
Materials
The following material list will make 2 nightstands.
- (1) 3/4" 4' x 8' sheet of plywood or 4 2' x 8' quarter sheets
- (1) 1/2" 2' x 4' quarter sheet of plywood
- (2) 1/4" 2' x 4' sheets of plywood
- (86) 1-1/4" coarse thread Maxi-Loc pocket hole screws
- (6) 1-1/4" tapered head wood screws
- (4) 1" round head wood screws
- (2) pairs of drawer slides
- (28) feet of 3/4" veneer edgebanding
- Staples, brads or 3/4" wood screws to attach the back
- Wood glue
- Assorted sandpaper
- Stain/finish or primer paint
Tools
- Drill and assorted bits
- Circular saw with guide, track saw or table saw
- Kreg Jig
- Iron (for edgebanding)
- Measuring tape
- Pencil
- Screwdriver
- Utility knife
- Sanding block or finish sander
- Painting/staining supplies
Make sure you understand how to use all the tools properly and follow all safety precautions.
Cut List
- (4) 25-1/4" x 17-1/4" 3/4" Plywood Sides
- (2) 22-1/2" x 19" 3/4" Plywood Tops
- (2) 20" x 16-1/2" 3/4" Plywood Bottoms
- (2) 20" x 4-1/2" 3/4" Plywood Bases
- (2) 19-3/4" x 6" 3/4" Plywood Drawer Fronts
- (6) 20" x ~4" 3/4" Plywood Stretchers
- (4) 14-3/4" x 5" 1/2" Plywood Drawer Box Sides
- (4) 17-1/2" x 5" 1/2" Plywood Drawer Box Front/Backs
- (2) 25-1/4" x 21-1/2" 1/4" Plywood Backs
- (2) 18" x 14-1/4" 1/4" Plywood Drawer Bottoms
Cut Plan
3/4" Plywood
The main elements of the nightstand are made out of 3/4" plywood. You'll need 2 quarter sheets per nightstand or 1 full sheet to make two nightstands.
Note: Only one dimension given for stretchers. The length is the important measurement for the stretchers. You can make them any width that is easiest for you as long as they're at least 3" wide. Since I don't have a tablesaw to cut my plywood with, I usually cut the stretchers longer than necessary with my circular saw and guide and cut them to finished length with my miter saw once I'm ready to attach them after measuring the working cabinet.
Note: Only one dimension given for stretchers. The length is the important measurement for the stretchers. You can make them any width that is easiest for you as long as they're at least 3" wide. Since I don't have a tablesaw to cut my plywood with, I usually cut the stretchers longer than necessary with my circular saw and guide and cut them to finished length with my miter saw once I'm ready to attach them after measuring the working cabinet.
Full Sheet

Quarter Sheets
The cut plan below is for one nightstand. If you're making two you'll need to duplicate the cuts on the following 2 2' x 4' sheets for a total of 4 sheets. The formaldehyde freem PureBond 3/4 in. x 2 ft. x 4 ft. Cherry Plywood 1703 from Home Depot is a good choice and they're currently eligible for free shipping.
from Home Depot is a good choice and they're currently eligible for free shipping.
1/2" Plywood
You'll need one sheet of 1/2" plywood to make the drawer boxes for both nightstands. A good choice for the drawer boxes is PureBond 1/2 in. x 2 ft. x 4 ft. Maple Plywood.


1/4" Plywood
You'll need one quarter sheet of 1/4" plywood for the back and drawer bottom. Two if you're making two nightstands. Since part of the back will be seen through the open shelf it's important for the 1/4" plywood to match the species of the 3/4" plywood. You can use PureBond 1/4 in. x 2 ft. x 4 ft. Cherry Plywood.


Step 1
Apply veneer edgebanding to the top of the Base and drill pocket holes as shown. Place the Bottom piece upside down on a flat work surface so you can attach the Base to it. Make sure the Base is also upside down so that the veneered edge is touching the work surface. Use wood glue and 1-1/4" coarse head screws to attach the Bottom to the Base through the pocket holes. Make sure the pieces line up and are square.

Step 2
Apply veneer edgebanding to the front edges of both Side pieces then attach one side at a time to the Base/Bottom piece from the previous step using 1-1/4" screws and glue. The bottom of the Side should be even with the bottom of the Base and the edge with the edgebanding should be on the same side as the base as well. Make sure everything goes together square.

Step 3
Make sure all three stretchers are the correct length to keep the nightstand square. Attach veneer edgebanding to one of the long edges of 2 of the stretchers. Drill 4 pocket holes in each stretcher.
Attach two of the three stretchers. One to the top front (with edgebanding out) and one on the back top (no edgebanding) as shown.

Step 4
Attach the 1/4" plywood Back to the back of the nightstand. You can use staples, 5/8" - 3/4" brads or 3/4" wood screws. If you screw the back on make sure to drill pilot holes and countersink holes first to avoid splitting the plywood sides.

Step 5
Cut the Drawer Front so that it fits in between the 2 Sides and the top Stretcher with about a 1/8" gap all around after applying veneer edgebanding along each edge of the Drawer Front. Measure the height of the Drawer Front and add 1/4" to it. That's the distance you need to screw the remaining Stretcher from the top/front Stretcher. Apply veneer edgebanding to the front of it and drill 4 pocket holes on the side facing the top stretcher.

Step 6
Build the Drawer Boxes. The measurements assume side mounted drawer slides that require a 1/2" space between the drawer box and side of the nightstand. You'll need to cut a 1/4" rabbet on the bottom of all the drawer side pieces to accept the drawer bottom. The easiest way to do this is if you have a router table. If you don't use can use a circular saw set at 1/4" depth.
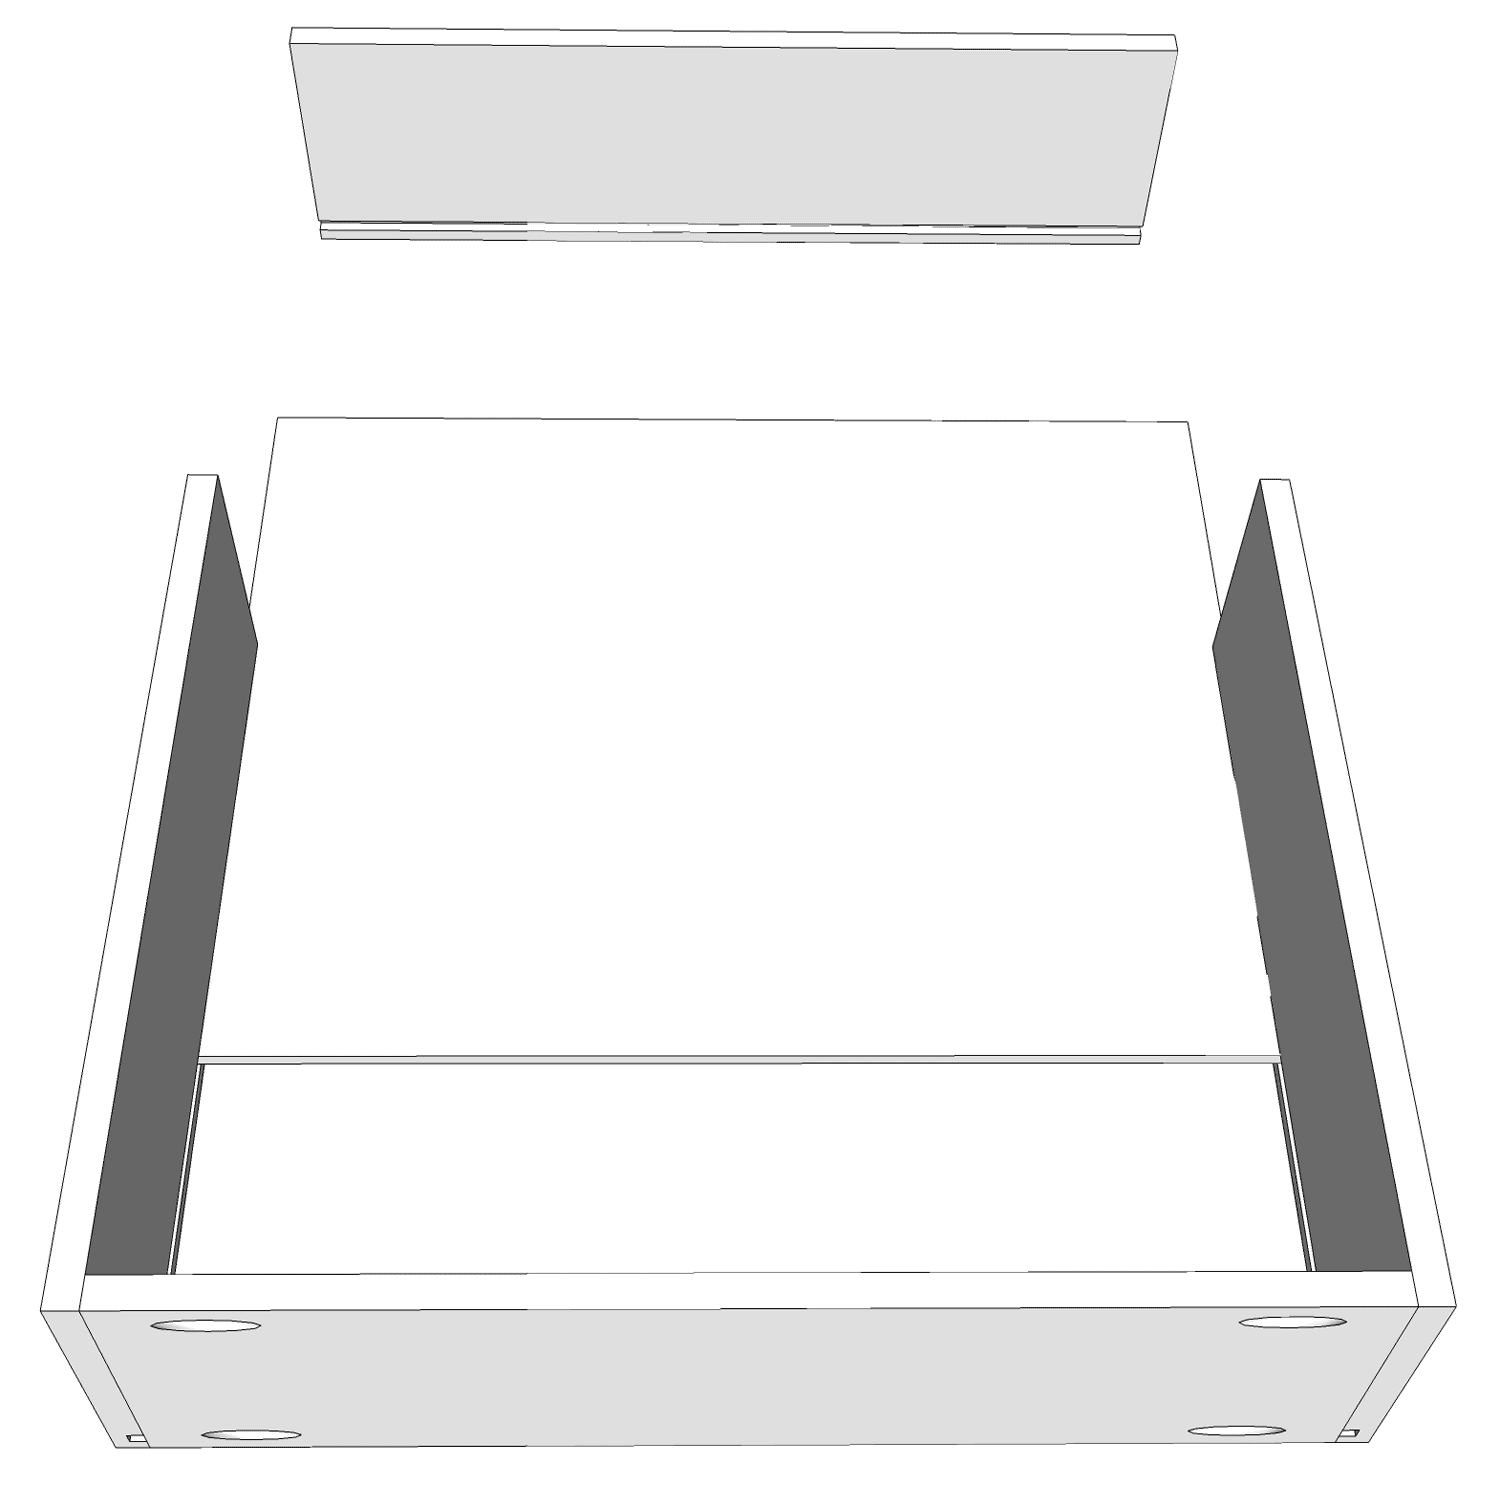
When you're done with the drawer box, attach the drawer slides to the sides of the cabinet and the drawer box according to the specifications of the slide.
Step 7
Wrap all four edges of the top with veneer edgebanding. Drill pocket holes on the top of the Sides and the back Stretcher to attach the Top to the nightstand from underneath using 1-1/4" pocket screws. Use 1-1/4 wood screws countersunk into the front Stretcher. The back and the sides should have a 1/2" overhang. The front should over hang 1".

Step 8
Insert the drawer box into the drawer slides and place a strip of double sided tape on the front of the drawer box. Position the drawer front on the drawer box leaving an even gap all around. Press the Drawer Front into the tape to temporarily hold it in place. Carefully pull out the drawer by pulling on the drawer box from underneath and use 2 1" round head wood screws to attach the drawer box to the drawer front from inside the drawer box. Once secured drill the holes for your drawer pull and install.

Step 9
Prepare your nightstands for finishing by filling in any holes with wood filler, sanding and then removing all sanding dust. Prime and paint or stain and polyurethane how you'd like.

Better Box Fan Air Purifier

A better more efficient and odor eliminating homemade air purifier than just taping a 20x20x1 filter to a box fan. Sometimes you need to help clear the air in a dirty environment but don't want to use an expensive air purifier such as in a room after renovating and painting. Here's a cheap and easy way to build one.
Air purifiers can be expensive and you've probably seen articles recommending to just put a 20" x 20" x 1" furnace filter on a cheap 20" box fan and POOF! instant cleaner air for not a lot of money. It really does clean the air pretty cheap.
There's a problem with this though. These fans weren't designed to be run with a filter. The filter will restrict air flow which will put a higher strain on the motor causing it to use more electricity and in worse cases could be a fire hazard. The higher the MERV rating (cleaning efficiency) of the filter the more stress it will put on the fan.
Don't worry! You can still have your cheap air purifier as long as the filter area is increased to decrease the effect of air resistance. Instead of using one 20x20x1 filter we'll use two 20x25x1 filters which increases the filter surface area over 250%. It's a little more expensive because you're using two filters instead of one but the increased filter surface area also helps the filter last longer before it gets clogged up and we're saving on energy use compared to a single filter.
I can't take credit for the design, I found it via Marshall Hansen Design but I'm using different filters.
I recently remodeled my basement and there's a lot of dust (including drywall dust and sawdust) and fumes from paint, cleaners and other building materials. It's an underground basement and mold has to always be a conern too. Because part of the space will be my home theater in the future I plan to get a more expensive air purifier that's smaller and quieter such as this Fellowes Quiet Air Purifier AP-300PH with True HEPA Filter
 because it has great reviews, is reasonably priced and the replacement filters aren't that expensive or a Sharp Plasmacluster True HEPA Air Purifier
 or Blueair HepaSilent Air-Purification System
 if I find some extra Benjamins in the couch cushions. But I don't want to put that in the dusty environment right away because I'll have to replace the more expensive filters fairly quickly because the air is so bad. I also don't want to spend the money right now but I do want cleaner air now.
So I decided to get things going with a homemade air purifier that has filters that not only clean the air of particulates but also reduce VOCs and odors. Even after I purchase an air purifier I'll still have an air purifier I can use for other purposes like when I'm painting or cutting wood.
Also, don't forget to add more plants to your home. They're natures air purifiers. Not only do they convert carbon dioxide to oxygen but houseplants filter toxins and emit negative ions too!
What You'll Need
Materials
- Filtrete Home Odor Reduction Filter, 20-Inch by 25-Inch by 1-Inch, 4-Pack
(only using 2 at a time)
- 20" Box Fan
- Cardboard (from the package the filters came in) or oak tag
- Duct Tape or Clear Cellophane Tape
- Optional Plug-in Timer
so the fan isn't running constantly without manual intervention.

Tools
- A pair of scissors or utility knife
Quick Info About Filters
The nice thing about this box fan filter setup is you can use any filters you want. If you are only concerned about large particles generated from something like cutting wood, you can use cheaper, lower MERV rated filters. If you're worried about finer particles from allergens such as mold, you can use a higher MERV rated filter. To understand more about what the MERV ratings mean have a look at Table 2 on this EPA article on residential air.
I chose to go with the Filtrete Home Odor Reduction Filters which are a new type of filter from Filtrete. They contain a lot of activated carbon to help filter out odors and VOCs. They are rated MERV 11 and are equivalent to their 1000 MPR furnace filters. They should do a good job with even the fine drywall dust and the activated carbon will help a lot with odors. I bought a 4 pack for around $57 which gives me 2 sets of filters.
 |
| Filtrete Odor Reducing Air Filters |
 I've been using in my air conditioning for the past few years. Plus Filtrete packs over 180 grams of activated carbon to help reduce odors.
After I go through both sets of carbon filters I'm probably going to switch to the Filtrete Elite Allergen Reduction Filter
 which does a much better job of filtering small particles. If odors are a problem I'll get some Cut-to-fit Carbon Prefilters
 and tape them over top of the Filtrete filters.
Okay, enough of the why, now for the how!
Step 1: Unbox The Filters
You're thinking "OMG! He's actually describing how to open a cardboard box?!?!?!" The best deal I found for these filters were on Amazon and with my Prime membership (or supersaver shipping) the shipping is free. Plus the packing box is going to be part of the filter so we need to keep in intact.The box is sealed very well. Not only is it taped but the seams are also glued together. To get the filters out of the box I cut the top where it's perforated with a utility knife as shown.

Be careful not to cut too deep and damage the filters. Keep the box someplace safe to the side while we continue.
Step 2: Hinge Filters
Start by taking 2 of the filters out of their plastic wrappers and lay them one on top of the other with the air flow arrows pointing towards each other. With the Odor Reducing Fitlers this means the black, carbon sides will be facing each other.

With the filters lined up, tape one of the short (20") edges of the filters to create a hinge between the two filters as shown.

I decided to go with white duck tape so it looks a little nicer but it makes it hard to see in the photos against the white cardboard filter frame.

With the filters lined up, tape one of the short (20") edges of the filters to create a hinge between the two filters as shown.

I decided to go with white duck tape so it looks a little nicer but it makes it hard to see in the photos against the white cardboard filter frame.
Step 3: Tape Filters To Fan
Lay the box fan face down on a flat surface to mount the filters to the back making sure the bottom of the filters are about flush with the bottom of the fan and do not extend past the bottom.

Use a strip of duck tape to secure each side to the side of the fan.


Use a strip of duck tape to secure each side to the side of the fan.

Step 4: Cut and Attach the Cardboard
Cut out one of the large sides of from the cardboard shipping box, place it over the top of the of the filters and secure it with a strip of tape to the top of the fan. Position it so that it's pretty even over both filters but it doesn't have to be perfect.

Using a pencil, trace around the filters (while pressing down the cardboard so nothing moves) to mark where the cardboard needs to be cut.
Lift the cardboard up (the front piece of tape acts like a hinge) and cut along the lines to trim the sides. By the way, I really like these Fiskars Cuts+More 5-in-1 Multi-Purpose Scissors .
.

Repeat the process for the bottom cardboard. The other large piece from the box is seamed but it's taped and glued and very stiff so it shouldn't be an issue but you can run a strip of duck tape over the seem if it makes you feel better.
Also keep in mind that the bottom of the fan has feet. I positioned the cardboard underneath the feet and then pulled the feet out to tape.

After taping up the sides of the bottom cover to the filters, I added an extra strip of duck tape all the way around where the filters/cardboard meets the fan for added support. The rounded corners of the fan means there might still be an air gap there so check them and add extra duck tape if necessary. On the bottom there are also some holes, duck tape over those as well. Finally, replace the feet.


Using a pencil, trace around the filters (while pressing down the cardboard so nothing moves) to mark where the cardboard needs to be cut.
Lift the cardboard up (the front piece of tape acts like a hinge) and cut along the lines to trim the sides. By the way, I really like these Fiskars Cuts+More 5-in-1 Multi-Purpose Scissors
.
Repeat the process for the bottom cardboard. The other large piece from the box is seamed but it's taped and glued and very stiff so it shouldn't be an issue but you can run a strip of duck tape over the seem if it makes you feel better.
Also keep in mind that the bottom of the fan has feet. I positioned the cardboard underneath the feet and then pulled the feet out to tape.

After taping up the sides of the bottom cover to the filters, I added an extra strip of duck tape all the way around where the filters/cardboard meets the fan for added support. The rounded corners of the fan means there might still be an air gap there so check them and add extra duck tape if necessary. On the bottom there are also some holes, duck tape over those as well. Finally, replace the feet.
Step 5: Seal The Back
Where the hinged filters meet the cardboard in the back, add another strip of duck tape for support and to seal any gaps.

Give another look around the seams to make sure there aren't any gaps. If you find any, tape them up.
When using the fan, I always make sure that the cord isn't underneath the cardboard and instead is under the metal fan chassis, just in case something goes wrong and the cord overheats. Can never be too safe.
Replacing Filters
When it's time to replace filters, use a utility knife to cut the filters free but leave the cardboard in place. Then just hinge and attach the new filters.
Computer Desk From 1 Sheet of Plywood

This attractive and functional computer desk is built using only one sheet of plywood and 14 cuts which makes it an easy and affordable desk that can be built with a few tools.

The desk provides ample space for your computer and accessories as well as storage space for books, paper and other items you'll want to have handy while working on your computer. All this from just a single sheet of plywood!
Dimensions
48"W x 33 1/2"H x 23 15/16"D

What You'll Need
Materials
- (1) 4' x 8' Sheet of 3/4" Plywood (or 4 sheets of 2' x 4' 3/4" Plywood)
- (50') of Preglued Veneer Edgebanding
- (4) T-Nut Cabinet/Furniture Levelers
(optional but recommended)
- (61) Kreg SML-C125-100 1-1/4-Inch 8-Coarse Maxi-Loc Pocket Screws
- (3) 3/4" Corner Braces
- (6) 1/2" flat head wood screws
- (6) 1/4" Shelf Pins
- Wood Glue
- 220 and 120 grit sandpaper
- Painting and/or finishing supplies

Tools
- Kreg Pocket Hole Jig
- Drill
- Circular Saw with Guide, Track Saw or Table Saw for cutting plywood.
- Miter box or power miter saw
- Kreg KHC-90DCC 90-degree Corner Clamp
(highly recommended)
- Pegboard and 1/4" bit or Shelf Pin Drilling Jig
- Square
- Measuring Tape
- Pencil
- Sanding block
- Assorted painting and/or finishing tools

Make sure you understand how to use all the tools properly and follow all safety precautions.
Cut-List
Please note that if making the desk out of 4 sheets of 2' x 4' plywood that some of the dimensions will be slightly different. Quarter sheet dimensions are in parenthesis when they differ.
- (1) 48" x 23-15/16" Desk Top (48" x 24" one whole quarter sheet)
- (2) 26-1/8" x 23-15/16" Sides (24" x 26-1/4")
- (1) 46-1/2" x 12" Apron (46-1/2" x 12-1/4")
- (2) 46-1/2" x 1-11/16" Front (46-1/2" x 1-1/2")
- (1) 48" x 10" Shelf
- (1) 21-5/8" x 12" Storage Side
- (2) 21-5/8" x 11-7/8" Storage Bottom and Storage Shelf
- (2)10" x 5-7/8" Shelf Sides (10" x 5-15/16")
- (1) 10" x 11-7/8" Paper Tray (11.5" x 10")
- (4) 1-3/8" x 5-7/8" Paper Tray Supports (2 will be 7/8" x 5-7/8")
Cut Plan
You can either cut the desk out of one full 4' x 8' sheet of plywood or 4 2' x 4' quarter sheets of plywood. If you're using quarter sheets I'd recommend the formaldehyde free PureBond 3/4 in. x 2 ft. x 4 ft. Maple Plywood which can be shipped directly to your home from HomeDepot.com and is eligible for free shipping.For either full or quarter sheets the cut plans assume a maximum kerf (cut width) of 1/8" so it's important to use a thin kerf saw blade. The Freud Ultimate Plywood Saw Blade is a good choice for a thin kerf blade that will minimize tearout and splintering when cutting plywood.
Full Sheet
If using a full sheet of plywood, break down the sheet into three smaller sections by making the 2 cross cuts highlighted in red. First make the 48" cut, followed by the 26-1/8" cut. You can also break down the three sections further. The 48" and 26-1/8" section can be cut exactly in half (23-15/16 accounting for the 1/8" kerf) but the last section is not exactly in half (24")

Quarter Sheet
You save a little bit of money by buying one full sheet but it might be more convenient to purchase 4 quarter sheets instead. The smaller sheets are easier to transport and you can even have them delivered to you for free. If you're picking up the plywood you could have the store make some convenience cuts for you but the quality and accuracy of the cuts will depend greatly on the condition of the blade and how good the person operating the panel saw is at making accurate cuts. These convenience cuts are not guaranteed to be accurate.

General Instructions
It's important to know how to use all your tools and follow all the safety recommendations. This project consists of simple cuts but it's important to make sure to measure and cut each piece carefully. Square cuts in the plywood will make for a stronger desk. It's not necessary to glue the desk together as the pocket screws will provide sufficient strength and allow you to disassemble the desk at a later point if necessary. You will need to cut and assemble the desk first, then it is highly recommended to break it down again for finishing.
Step 1
Cut out the Desk Top, Sides, Storage Side, Storage Shelf, Storage Bottom, Apron and Front. Apply veneer edgebanding to all edges of the Desk Top, the 2 long edges of each Side and the front edges of the Storage Shelf, Bottom and Side.
Decide which side you'd like the storage to be on, the left or right, then choose that Side piece and the Storage side and drill a series of holes part way into the insides of the plywood for the shelf pins using either a piece of peg board or a shelf pin jig.

Step 2
Arrange the desk top and legs on the floor with the good faces facing out. Drill 5 pocket holes on the inside tops of each leg. The first hole towards the front should be about 1" in while the one towards the back should be about 1/2" in to accommodate the front strip and modesty panel (apron).
Align and secure each leg to the bottom of the desk top using 1-1/4" pocket hole screws. Make sure the sides are attached square to the top. Using the right angle clamp helps a lot.

Step 3
Attach the front strip flush to the front of the desk using 4 pocket holes with 1-1/4" screws on the back to attach to the sides and 3 3/4" corner braces with 1/2" flat head wood screws to attach to the top as shown below.

Step 4
Drill holes for pocket screws in the Storage Side and Apron (modesty panel) as shown. There is also a pocket hole going from the inside of the Storage Side into the Front which is not visible. First attach the Storage Side. Use the Storage Bottom as a guide to determine how far away it needs to be from the Side of the desk. Note that the Storage Side will butt up against the Front piece but will not extend all the way to the back of the desk.
Once you've attached the Storage Side, attach the Apron using pocket screws into the Sides and Top and from the Storage Side into the Apron. The Storage Bottom and Storage Side have the same depth, use the Storage Bottom as a guide on the opposite side of the Storage Side to press the Apron against so you screw it in straight.

Remember, the Apron will not sit flush with the back of the desk. Here's a rear view.

Step 5
Attach the Storage Bottom using 1-1/4" pocket holes as shown. If you're installing the optional leveler feet do so now.

The main part of the desk is now complete.
Step 6
Cut out the components for the Shelf. These include the Shelf, 2 Shelf Sides, Paper Tray and Tray Supports. Apply veneer edging all the way around the Shelf, on 3 edges of the Papery Try (not the edge touching the side), on the 2 short edges of each Side and on the 2 long edges of each of the Tray Supports.
Begin shelf assembly by attaching the two Shelf Sides to the Shelf Top using 1-1/4" pocket hole screws as shown.

Step 7
Drill 1 pocket hole in each of the tray supports to attach it to the top. The pocket holes should be on the inside of the support. Use the Paper Tray butted up against the side where you'd like to install as a guide to determine how far away the Supports should be. The tray supports should be evenly spaced 1.5" apart with the two end pieces flush with the edges of the Shelf Top.

Step 8
Now attach the paper tray at the midpoint of the sides and supports to split the space evenly using 1-1/4" pocket hole screws as shown. 3 into the Shelf Side and 1 into each Tray Support.

Step 9
To prevent the shelf from sliding around on the desk but still be able to easily remove the shelf at a later point if desired we'll be using 2 shelf pins to anchor the shelf to the desk.
Begin by placing the shelf on top of the desk and aligning it flush with the sides and the back of the desk top. Using a pencil, mark a vertical like halfway into the shelf side extending down into the side of the desk top as shown.

Use a square to transfer the marking onto the desk top as well as the bottom of the shelf side. Measure in 3/8" on that line and mark it. Using the shelf pin drill bit drill a hole into the top of the desk as well as the bottom of the shelf side. Do this on both ends for a total of 4 holes, 1 in each shelf side bottom, and two on the desk top.

Take your time and be very careful with these measurements so they line up properly. Once you have all 4 holes drilled, fine tune them by slightly deepening or widening the holes in the Shelf Sides. Finally insert a shelf pin in each hole on the Desk Top and slide the Shelf onto them.
Step 10
Your desk is now complete and is ready to be finished with either primer/paint or stain/polyurethane or a combination of the two. It will be easier to finish some sections if you take the desk apart first. Just follow these directions backwards to take everything apart. Then follow the directions on how to put all the pieces together again.

Subscribe to:
Posts (Atom)