Showing posts with label Woodworking. Show all posts
Showing posts with label Woodworking. Show all posts
Friday, December 4, 2015
Plywood Open Nightstand


Free woodworking plans to build simple nightstands out of plywood. Features a drawer and open shelving. You can build 2 nightstands out of 1 sheet of 4' x 8' plywood plus 3 quarter sheets for the drawer and back.
This is a relatively easy piece of bedroom furniture you can build with tools most DIY'ers have. Made from real plywood (since you choose your own wood) and not particle board like most furniture seems to be these days.
Dimensions
Dimensions: 22-1/2"W x 26"H x 19"


What You'll Need
Materials
The following material list will make 2 nightstands.
- (1) 3/4" 4' x 8' sheet of plywood or 4 2' x 8' quarter sheets
- (1) 1/2" 2' x 4' quarter sheet of plywood
- (2) 1/4" 2' x 4' sheets of plywood
- (86) 1-1/4" coarse thread Maxi-Loc pocket hole screws
- (6) 1-1/4" tapered head wood screws
- (4) 1" round head wood screws
- (2) pairs of drawer slides
- (28) feet of 3/4" veneer edgebanding
- Staples, brads or 3/4" wood screws to attach the back
- Wood glue
- Assorted sandpaper
- Stain/finish or primer paint
Tools
- Drill and assorted bits
- Circular saw with guide, track saw or table saw
- Kreg Jig
- Iron (for edgebanding)
- Measuring tape
- Pencil
- Screwdriver
- Utility knife
- Sanding block or finish sander
- Painting/staining supplies
Make sure you understand how to use all the tools properly and follow all safety precautions.
Cut List
- (4) 25-1/4" x 17-1/4" 3/4" Plywood Sides
- (2) 22-1/2" x 19" 3/4" Plywood Tops
- (2) 20" x 16-1/2" 3/4" Plywood Bottoms
- (2) 20" x 4-1/2" 3/4" Plywood Bases
- (2) 19-3/4" x 6" 3/4" Plywood Drawer Fronts
- (6) 20" x ~4" 3/4" Plywood Stretchers
- (4) 14-3/4" x 5" 1/2" Plywood Drawer Box Sides
- (4) 17-1/2" x 5" 1/2" Plywood Drawer Box Front/Backs
- (2) 25-1/4" x 21-1/2" 1/4" Plywood Backs
- (2) 18" x 14-1/4" 1/4" Plywood Drawer Bottoms
Cut Plan
3/4" Plywood
The main elements of the nightstand are made out of 3/4" plywood. You'll need 2 quarter sheets per nightstand or 1 full sheet to make two nightstands.
Note: Only one dimension given for stretchers. The length is the important measurement for the stretchers. You can make them any width that is easiest for you as long as they're at least 3" wide. Since I don't have a tablesaw to cut my plywood with, I usually cut the stretchers longer than necessary with my circular saw and guide and cut them to finished length with my miter saw once I'm ready to attach them after measuring the working cabinet.
Note: Only one dimension given for stretchers. The length is the important measurement for the stretchers. You can make them any width that is easiest for you as long as they're at least 3" wide. Since I don't have a tablesaw to cut my plywood with, I usually cut the stretchers longer than necessary with my circular saw and guide and cut them to finished length with my miter saw once I'm ready to attach them after measuring the working cabinet.
Full Sheet

Quarter Sheets
The cut plan below is for one nightstand. If you're making two you'll need to duplicate the cuts on the following 2 2' x 4' sheets for a total of 4 sheets. The formaldehyde freem PureBond 3/4 in. x 2 ft. x 4 ft. Cherry Plywood 1703 from Home Depot is a good choice and they're currently eligible for free shipping.
from Home Depot is a good choice and they're currently eligible for free shipping.
1/2" Plywood
You'll need one sheet of 1/2" plywood to make the drawer boxes for both nightstands. A good choice for the drawer boxes is PureBond 1/2 in. x 2 ft. x 4 ft. Maple Plywood.


1/4" Plywood
You'll need one quarter sheet of 1/4" plywood for the back and drawer bottom. Two if you're making two nightstands. Since part of the back will be seen through the open shelf it's important for the 1/4" plywood to match the species of the 3/4" plywood. You can use PureBond 1/4 in. x 2 ft. x 4 ft. Cherry Plywood.


Step 1
Apply veneer edgebanding to the top of the Base and drill pocket holes as shown. Place the Bottom piece upside down on a flat work surface so you can attach the Base to it. Make sure the Base is also upside down so that the veneered edge is touching the work surface. Use wood glue and 1-1/4" coarse head screws to attach the Bottom to the Base through the pocket holes. Make sure the pieces line up and are square.

Step 2
Apply veneer edgebanding to the front edges of both Side pieces then attach one side at a time to the Base/Bottom piece from the previous step using 1-1/4" screws and glue. The bottom of the Side should be even with the bottom of the Base and the edge with the edgebanding should be on the same side as the base as well. Make sure everything goes together square.

Step 3
Make sure all three stretchers are the correct length to keep the nightstand square. Attach veneer edgebanding to one of the long edges of 2 of the stretchers. Drill 4 pocket holes in each stretcher.
Attach two of the three stretchers. One to the top front (with edgebanding out) and one on the back top (no edgebanding) as shown.

Step 4
Attach the 1/4" plywood Back to the back of the nightstand. You can use staples, 5/8" - 3/4" brads or 3/4" wood screws. If you screw the back on make sure to drill pilot holes and countersink holes first to avoid splitting the plywood sides.

Step 5
Cut the Drawer Front so that it fits in between the 2 Sides and the top Stretcher with about a 1/8" gap all around after applying veneer edgebanding along each edge of the Drawer Front. Measure the height of the Drawer Front and add 1/4" to it. That's the distance you need to screw the remaining Stretcher from the top/front Stretcher. Apply veneer edgebanding to the front of it and drill 4 pocket holes on the side facing the top stretcher.

Step 6
Build the Drawer Boxes. The measurements assume side mounted drawer slides that require a 1/2" space between the drawer box and side of the nightstand. You'll need to cut a 1/4" rabbet on the bottom of all the drawer side pieces to accept the drawer bottom. The easiest way to do this is if you have a router table. If you don't use can use a circular saw set at 1/4" depth.
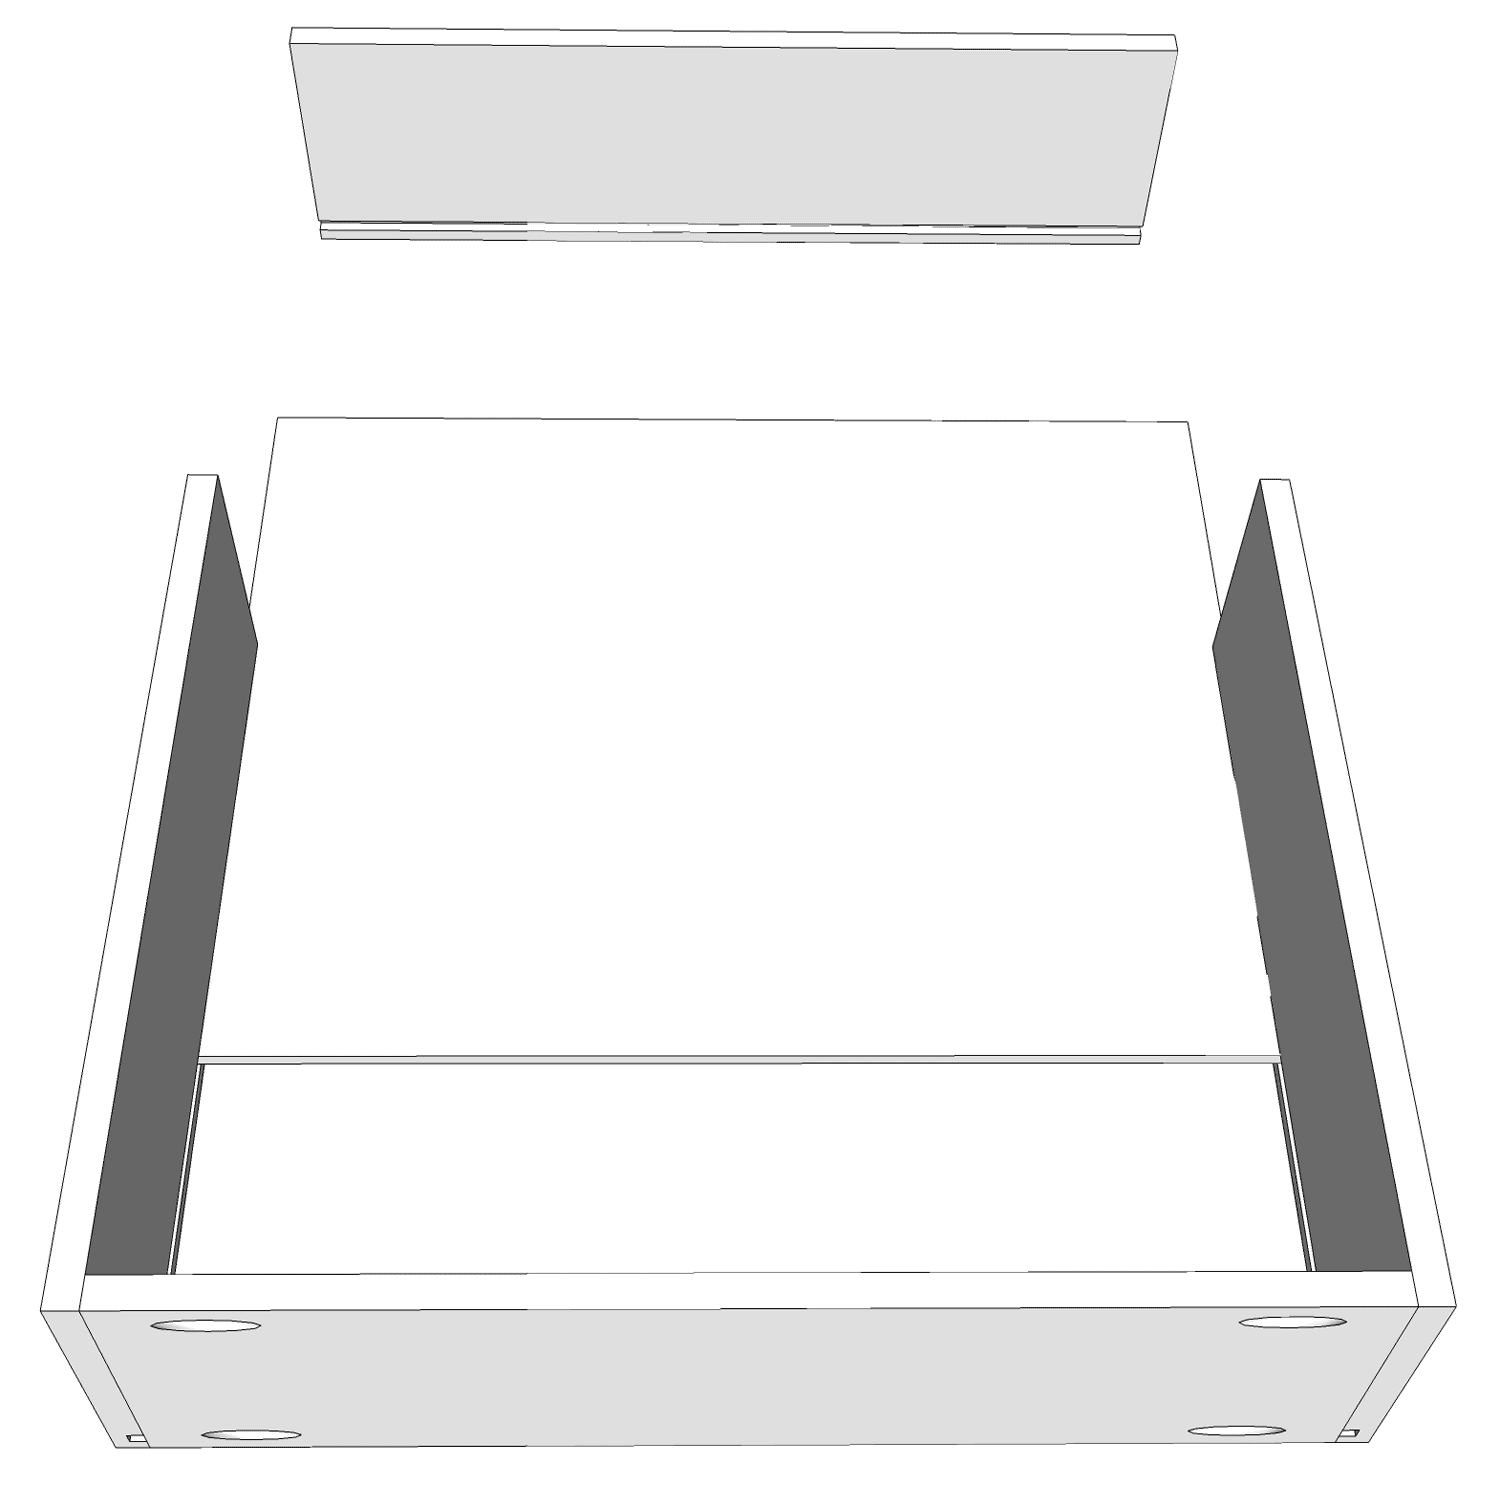
When you're done with the drawer box, attach the drawer slides to the sides of the cabinet and the drawer box according to the specifications of the slide.
Step 7
Wrap all four edges of the top with veneer edgebanding. Drill pocket holes on the top of the Sides and the back Stretcher to attach the Top to the nightstand from underneath using 1-1/4" pocket screws. Use 1-1/4 wood screws countersunk into the front Stretcher. The back and the sides should have a 1/2" overhang. The front should over hang 1".

Step 8
Insert the drawer box into the drawer slides and place a strip of double sided tape on the front of the drawer box. Position the drawer front on the drawer box leaving an even gap all around. Press the Drawer Front into the tape to temporarily hold it in place. Carefully pull out the drawer by pulling on the drawer box from underneath and use 2 1" round head wood screws to attach the drawer box to the drawer front from inside the drawer box. Once secured drill the holes for your drawer pull and install.

Step 9
Prepare your nightstands for finishing by filling in any holes with wood filler, sanding and then removing all sanding dust. Prime and paint or stain and polyurethane how you'd like.

DIY Small Closet Organizer Plans

Free woodworking plans for a DIY small closet organizer for closets 3-5' wide.

Lack of shelf space tends to be the reason closets get so cluttered in the first place. We tend to use closets for more than just clothes. Anything that we don't want to throw away yet don't want out in the open gets thrown in the closet where it tends to get forgotten. If you haven't seen your closet floor in ages because it's pilled high with bags, boxes and shoes, that's a clear indication you lack enough shelf area in your closet. This closet organizer design aims to fix that problem.
Dimensions
Use these plans as a guide and customize them to your needs. The plans should work well for reach in closets between 3' to 5' wide and 24" deep. If your closet is larger, see my Closet Organizer Plan for 5' - 8' closets. If this seems like too much work check out my Easy Small Closet Organizer Plans.
In this example we're using a 48" wide by 24" deep reach-in closet that has an 11" space between the left side wall and the door trim. Make any necessary adjustments to suit your closet. Here is the floor plan of the closet we'll be working in.

If you're closet doesn't have much space between the sidewall and the door trim you won't be able to include the extended lower shoe shelves. You can still include the shoe shelves but they will only be 15" deep like the other shelves.

If you're closet doesn't have much space between the sidewall and the door trim you won't be able to include the extended lower shoe shelves. You can still include the shoe shelves but they will only be 15" deep like the other shelves.
What You'll Need

Materials
- (1) 4' x 8' sheet of 3/4" hardwood veneer plywood
- (1) 2' x 4' sheet of 3/4" hardwood veneer plywood
- about 32' of edgebanding
- (2) 8' 1x4 boards for main supports (match plywood species)
- (4) 8' 1x2 or 1x3 boards of shelf supports
- (1) Knape Vogt 96in Oval Tubing Chrome
- (2) pairs of Knape & Vogt Open Flange For 880 Tube Chrome
- (4) L brackets
- (32) Kreg SML-C125-100 1-1/4-Inch Coarse Washer-Head Pocket Screws
- 1-1/2" flat head wood screws for attaching plywood to supports
- 3-1/2" wood screws for attaching supports to studs


Tools
- Table saw, or circular saw with guide to cut plywood
- Miter saw or miter box to cut boards
- Kreg Pocket Hole Jig
- Drill
- Pilot hole/counter sink bits
- Level
- Tape measure
- Pencil
- Iron
- Utility knife or edgebanding trimmer
Cut List
- (1) 48" x 24" 3/4" Plywood Top Shelf
- (1) 82-1/2" x 15" 3/4" Plywood Main Divider
- (1) 42 x 15" 3/4" Plywood Lower Cabinet Side
- (1) 24-1/4" x 15" 3/4" Plywood Lower Cabinet Top
- (4) 15" x 15" 3/4" Plywood Shelves
- (3) 15" x 24" 3/4" Plywood Shoe Shelves
- Assorted 1x4 boards for main supports
- Assorted 1x2 or 1x3 lengths for shelf supports
Cut Plan
The size of your closet will most likely be different so double check the cut plan after you make the necessary adjustments to the component dimensions.
3/4" Plywood
The main parts of the closet organizer are cut from 3/4" hardwood veneer plywood. Two sheets where used for this plan, 1 full 4' x 8' sheet and one 2' x 4' quarter sheet.

Some of the cutoffs can be used for the 2" shelf supports but you might find it easier to use 1x2 or 1x3 boards that match the species of plywood you selected instead. It will save time in making all those little cuts and edgebanding.
1x4 Boards
The 1x4 boards are used for the top support as well as the lower support. The species of wood should match the plywood you selected and be finished the same way. You'll need 2 8' boards. Cut plan is not included because it will depend on your closet dimensions.
1x2 or 1x3 Boards
There isn't enough scrap on the plywood to create enough supports for the sweater and shoe shelves on the left of the organizer. You may want to forego the plywood supports and just use boards instead to minimize the cuts in plywood which can be time consuming if you don't have a table saw. Using boards also means you won't have to edgeband the supports that will be visible.
If you're using boards for all the shelf supports you'll need 4 8' boards.
Step 1: Cut and Finish Parts
It's best to cut out all the parts and finish them before installing the closet organizer. Make any adjustments necessary to suit your closet size, cut out the parts, apply edgebanding to the edges that will be visible, sand smooth with 80 then 120 grit sand paper, finally either prime and paint them or stain and seal them.
Oil based paints and finishes are not a good idea for closets because they can out gas for a long time and make your clothes smell. Instead use low VOC water based paints or water based stain and a water based finish such as Minwax Water-Based Polycrylic.
Step 2: Prepare Your Closet
While your waiting for the closet organizer components to fully cure, get your closet ready for the new organizer.
Empty out the closet and store your clothes in a safe place. Carefully remove the old closet shelf, rod and other boards that were a part of that configuration.
Patch the walls with joint compound, sand and then prime and paint with a low VOC water based paint.
Step 3: Mark For Top Support
Use a level to find the highest point in the closet floor along the back wall. Houses can shift over time and the floors won't always be level.
From the high point in the floor measure up 82-1/2" and draw a level line (in pencil) on the back wall, both side walls, and the front section where the shelves will be.

Please note that to make it easy to show the installation, some of the walls are not visible.
Step 4: Install Top Support
Measure and cut the 1x4 top support and screw it into the walls using 3-1/2" wood screws making sure to screw into the studs. The top of the board should align with the level line drawn in the previous step.
Install the supports in the order shown. Starting with the return wall, next the left side wall, the right side wall and finally the back wall. Check your stud locations on the right wall and cut that support long enough to be screwed into at least 2 studs, one in the corner, one towards the end.

Drive 2 screws at each stud location.
Step 5: Install Divider
Draw a plumb line using a level 15" from the left wall (the wall where the shelves will be.)

Prepare the divider by cutting a notch at the top to fit around the top support 1x4 and at the bottom to fit around the baseboards.
Drill 2 pocket holes at the top notch to be able to attach it to the top support.

Align the left side of the Divider with the plumb line and drive 2 screws through the top pocket holes. At the bottom use an L bracket to attach the divider to the floor, making sure it stays plumb.
Step 6: Install Lower Support
Draw a level line on the right side of the Divider, 42" up from the floor. Install the Lower Support 1x4 so the top is flush with the level line. Use 3-1/2" wood screws to secure the Lower Support into studs. Make sure that when you install the Lower Support you to not push the Main Divider out of plumb.

Secure the main divider to the end of the lower support using 2 1-1/2" wood screws. Drill pilot holes before driving the screws to prevent splitting.

Step 7: Assemble Lower Cabinet
The lower cabinet defines the bottom hanging area. It consists of the top and side and gets attached to the main divider.
Begin by drilling the necessary pocket holes in both pieces. In the Lower Cabinet Top there are 3 pocket holes on the side to attach to the main divider. In the Lower Cabinet Side there are 6 pocket holes. 3 on the top to attach to the Lower Cabinet Top, and 3 on the bottom to attach to the floor. You can also use an L-Bracket to attach the side to the floor instead.
After you drill the pocket holes, attach using the appropriate pocket screws as shown below.

Step 8: Install Lower Cabinet
Position the assembled Lower Cabinet over the Lower Support as shown. You'll need to cut a notch on the bottom of the Lower Cabinet Side to fit around your baseboards.

Make sure it's level and plumb all around and secure it to the Main Divider using pocket screws, to the Lower Support from the top and side using 1-1/2" wood screws that are countersunk (drill pilot holes to avoid splitting), and finally to the floor using pocket screws or L brackets.
Step 9: Install Top Shelf
Check to make sure the Top Shelf fits properly. Trim it to size if necessary then place it so it rests on the top supports.
Screw it in place using 1-1/2" wood screws that are predrilled and countersunk. Screw it down into the top supports as well as the top of the Main Divider.

Step 10: Install Closet Rods
Mount the Closet Rod Flanges, cut the pole to size using a hacksaw and mount them as shown.

The closet rods should be installed so that the top-center of the closet rod is 12" away from the back wall (not the back support) and 1-1/2" down from the shelf above it.

Step 11: Install Shelf Supports
Mark out level lines on the walls where the shelves will be installed. You can space the shelves whichever way works for you. A good starting point is about 12" spacing for sweater shelves and about 7" spacing for shoe shelves.
Use 3-1/2" wood screws driven into studs to install 2" strips of plywood (or 1x2 or 1x3 boards) at the marked lines to support the shelves as shown.

Step 12: Install the Shelves
Place the shelves on the shelve supports. Trim to size if necessary. Attach the shelves to the shelf supports by screwing down from the top with 1-1/2" wood screws that are pre-drilled and countersunk. On the side where the shelf meets the divider attach the shelf to the divider using pocket hole screws as shown.

For the lower shoe shelves that extend to the front wall, you'll need to mark and cut out an angle from the cabinet to behind the door molding.
Your closet organizer is now complete and ready for your clothes.

Easy Small Closet Organizer Plans

Free woodworking plans for a reach in closet organizer that provides double hang, long hang, shoe and sweater shelves for a small closet.

If your current closet only has a typical single rod and single shelf you can see how much space gets wasted. With a little bit of wood and a few hours of time you can dramatically increase the space utilization of your closet. If you've been dealing with a small 3'-4' closet you know how important it is to squeeze as much extra storage as possible.
Good shoes are expensive and just tossing them on your closet floor increases the likelihood they get damaged. Shoe shelves help protect the investment you've made in your shoes.
Providing space for long garments is also important and this organizer allows you room to hang up some of those long dresses or coats so you don't have to run to another room for them.
|
| The Right Hangers Save Space |
You can customize the dimensions of these plans to better suit your needs just keep in mind these general guidelines. The shelving unit needs to be 42" tall to be able to hold the double hanging rod. Women's shoes generally need about 7" of width, mens shoes 9" and sweaters and other folded clothing 12". Every body is different so measure how much space your clothes take and see if you need to customize the plan to get more efficient use.
What You'll Need
Materials
- (2) 2' x 4' Sheets of 3/4" MDF or better yet Formaldehyde free PureBond Maple Plywood
- (1) 6' 1x4 board
- (1) 6' 1x2 Board
- 1/4" Nickel Shelf Pins
- Screws
- Primer and Paint


Tools
- Circular saw with guide or table saw
- Jig Saw
- Kreg Pocket Hole Jig
- Kreg Shelf Pin Drilling Jig
(Optional but recommended)
- Drill
- Hammer
- Prybar
- Level
- Measuring Tape
- Pencil
Cut List
- (5) ~12" x 14" Shelves 3/4" Plywood
- (2) ~12" x 9" Shoe Shelves 3/4" Plywood
- (2) ~12" x 42" Shelving Unit Sides 3/4" Plywood (See Cut Plan for exact shape)
- (1) 24" Rod Support 1x4 Board (or whatever the depth of your closet is)
- (2) 14" Stretchers 1x4 Board
- (2) 18" Shoe Shelf Supports 1x2 Board
Cut Plan
3/4" Plywood
The first quarter sheet of 3/4" plywood will be for the shelves. You may want to alter the number and width of the shoe shelves depending on your design. The depth will be slightly less than 12" because of the kerf of the saw. Do your best to cut it as evenly down the middle as possible.

The second sheet is where we'll cut the sides for the shelving unit. To be able to limit the amount of plywood necessary the cuts aren't simple straight cuts. Again, the depth at the middle will be a little less than 12" due to the saw kerf. It's probably best to cut this out with a jig saw.

Boards
1x4: Two lengths of 1x4 need to be cut to the same width as the shelves, in our case 14" and one length that is determined by the depth of your closet for the lower rod support on the side wall.
1x2: One shoe support needs to be cut from 1x2 material for each side shoe shelf. The support needs to be long enough to reach from the back corner of the closet to at least the first side wall stud so that it is screwed securely at each end.

Step 1: Cut Lumber and Finishing
To minimize the time that the closet is out of service we're going to build much of the closet organizer before installing it. This includes finishing the wood so that it's dry when it's installation time. If you don't have a lot of space to lay all the plywood out flat to paint, you might find it easier to paint after you've assembled the shelving unit or just paint everything after installing but you'll have to wait until it dries before using the closet.
Double check your closet measurements and make any modification you need to the cut plan if you choose to customize the size based on your needs.
So that we can get 2 sides out of one 2' x 4' sheet of plywood they're not cut straight. Start off by cutting the board down to 42" in length. If you're comfortable making plunge cuts with a circular saw it's the best way to cut the horizontal cuts. The vertical cuts and rounded corners are best cut with a jig saw. You can also use a jig saw to make the entire cut just take your time and use a straightedge to get the cuts as straight as possible on the long stretches.
You may also want to increase the 4" to 6" or so for a little extra flexibility in positioning the lower rod.
You may also want to increase the 4" to 6" or so for a little extra flexibility in positioning the lower rod.

Once you have the 2 sides cut out, a notch will need to be cut out at the back bottom of each side to fit around your baseboards.
Once everything is cut, prime and apply two coats of water based paint. Let everything dry at least 2 days before continuing. Let the paint cure for at least a week (more if weather is humid) before placing items on the painted surfaces.
Step 2: Attach Top to Side
The shelving unit consists of 2 sides, 2 stretchers and 2 fixed shelves. We're going to begin constructing it by attaching the fixed top to one side using pocket hole screws from underneath.

Note that the back of the top is flush with the back of the side and the notch cut out in the back/bottom of the side for the baseboard so it will fit close up against the wall. The front of the top does not extend all the way to the front of the shelving side.
Step 3: Attach Bottom Shelf To Side
Next we'll attach the bottom to the side. The shelving unit needs 2 fixed shelves to make it sturdy. The location of the top shelf needs to be at the top but you have some flexibility when positioning the bottom shelf.
I've planned for the bottom of the bottom shelf to be 12-1/2" from the bottom of the side but depending how big the items you plan to store in that area are, you might want to increase or decrease it. For example, if you want to store boots you may want to increase it.
Make sure the side is square to the front of the side and attach it using pocket hole screws as you did the top.

Step 4: Attach Stretchers To Side
Two stretchers cut from 1x4 boards are used to provide a way to attach the shelving unit to the wall as well as provide extra strength. Using pocket screws attach them to the side and fixed shelves as shown.

The bottom stretcher needs to clear the baseboard notch. If you want the shelf lower, mount the stretcher above the bottom shelf instead of below it.
Step 6: Attach Other Side
Finally we'll attach the other side of the shelving unit using the previously drilled pocket holes in the fixed shelves and stretchers. It's important that everything gets screwed together square.


Step 7: Drill Shelf Pin Holes
With the shelving unit completed we can now drill 2 rows of shelf pin holes on each side of the shelving unit. This is much easier to do with a jig like the Kreg Shelf Pin Drilling Jig.
For each set of holes use the same reference point. For example start all sets of holes by resting the bottom of the jig against the bottom shelf.
If you don't have a pocket hole jig you can either screw the shelves in directly using pocket hole scres or you can manually mark and drill the holes for the shelf pins. 1-1/4" spacing 2" from the front and back should do it.
.For each set of holes use the same reference point. For example start all sets of holes by resting the bottom of the jig against the bottom shelf.
If you don't have a pocket hole jig you can either screw the shelves in directly using pocket hole scres or you can manually mark and drill the holes for the shelf pins. 1-1/4" spacing 2" from the front and back should do it.
Step 8: Move Existing Rod and Shelf
With the shelving unit complete and the rest of the components primed and painted it's time to start preparing the closet. To save some money we're going to reuse the existing rod and shelf. A typical closet has it's shelf installed at around 66" above the floor.

To accommodate a double hang space the shelf and rod are going to need to be moved further up so that the bottom of the top shelf is at 84" above the floor.
Typically the closet will have 1x4 boards installed at the 66" mark on three walls that will support the shelf and rod. Try and determine how the boards are attached to the wall. They're probably just nailed in but sometimes they'll be screwed in.
Start by trying to remove the top shelf. Run a utility knife around the edges where the shelf meets the walls and 1x4s to break any paint that might be helping keep them together. Use a prybar to lift the top shelf off. If it's not coming up easily check for any screws and unscrew them.
Next the closet rod should be easy to lift off.
Finally start removing the 1x4 support boards. We want to reuse all these pieces so take your time and try to avoid breaking them.
Use a level to draw a line as a guide to reinstall the existing closet rod and shelf. The tops of the support boards need to be at 84". To make installing easier draw your level reference line at 84" minus the width of board. Your boards may vary but if they're 1x4's they'll be 3-1/2" wide. So draw a line at 80-1/2" above the highest point on the floor.
Now reinstall the support boards into the closet lining up the bottom of the boards with the reference line. That should put the top of the boards at 84".
Place the rod back in and then attach the shelf.
There will be some holes in your walls and mismatched paint so fill in any holes with spackle, and sand any paint edges. When the spackle dries, sand it smooth then prime and paint the entire closet. For a closet, water based low VOC paint like Benjamin Moore's Aura is a good idea so that your clothes don't wind up smelling like paint.
Step 9: Install Shoe Shelf Supports
Before installing the shelving unit it's a good idea to install the wall supports for the side shoe shelves now that there's plenty of room to work. Typically, shoe shelves are installed 7" apart but you can change that to suit your needs. Keep in mind that the shoe shelves will reduce the height of the long hang area. If you have especially long garments to hang you might want to limit the number of shelves you're installing. If you use special pants hangers on the lower bar of the double hang section there should be sufficient room for shoes underneath your pants if extra shoe storage is important.
The shoe shelf supports are cut from the 1x2 boards. Make sure you cut them long enough so that they can be attached to at least 2 studs near the ends of the support.
Draw two level lines on the side wall, one 7" up and the other 14-3/4" up from the floor. (Or more or less depending on how high your shoes are.) Use these lines as a guide to align the tops of the 1x2 boards and drill or nail them into the studs on the side wall.

Step 10: Install Shelving Unit
Position the completed shelving unit against the back wall. It's position in relation to the sidewalls will determine how much extra hanging space you get via the double hang section as well as how much long hanging section you have. In this design I chose to put the shelving unit 9" from the left side wall. That will provide 9" of long hang which is enough to hold 4-6 long hanging items. If you need more or less you can position the unit as you see fit. I think it's a good idea for all closets to have at least some long hang area.
The position of the shelving unit will also determine the length of the extra shoe shelves on the left. Since you should have cut out the shoe shelves before this point you can rest one of the shoe shelves on the shoe shelf support and use it to determine where to position the shelving unit.

Once you have the shelving unit where you want it, make sure it's level and plumb then secure it to the wall by screwing it into studs through the back stretchers.
Step 11: Install Lower Rod Support
The lower rod support is a 1x4 board that is cut to be as long as the depth of the closet. Screw or nail it into studs on the right wall so that the top of the support is 42" above the floor. You can also draw a level line from the top of the shelving unit to determine where to position the support. Make sure it is installed level.

With the rod support in place you can now install the closet rod. Directions will depend on what rod you use but it's important that the top-center of the rod is about 12" away from the back wall and about 1-1/2" down from the top of the shelving unit top and that the rod is installed level.
Step 12: Install Shoe Shelves
To install the shoe shelves, pocket holes will be drilled on the underside of the right side to attach to the shelving unit. On the wall side screws will be drilled from the top down into the wall supports. Drill pilot holes and countersinks so the screws are flush with the top or you can simply nail the shelves in place. Pilot holes are a good idea to prevent splitting the wood.

Step 13: Install Adjustable Shelves
Push the shelf pins into the appropriate holes depending on how you'd like to space the shelves in the shelving unit. Then place the shelves on top of the pins. Once the paint dries you can fill up your closet again.
If you'd like to add a drawer or two see my instructions on how to build drawer boxes.

Subscribe to:
Posts (Atom)